This collection of printable modifications add functionality, style, performance, or easier maintenance to your Prusa MK3S 3D printer without causing negative side-effects or impacts.
Category: Tech
I decided to participate in WeTheBuilders‘ most recent project to make a large, distributed, crowd-sourced 3D printed statue.

This latest project was a statue of Charon, the psychopomp Styx ferryman of Greek mythology, sculpted by Ryan Kittleson. This collaboratively-printed sculpture was displayed at Loveburn 2025, in Miami in February 2025 and is now back in Baltimore awaiting display in a more permanent home.
A full gallery of the assembly process and final display at the festival.

Participating in the crowd-sourced project was a great experience. I ended up printing 4 pieces for the Charon statue. They provide the .STLs (via a check-out mechanism), you provide the plastic, the printing, and shipping to them.
Some quick facts about the project:
- The final statue was about 5 feet tall, 2.5 feet wide, and 4 feet front-to-back.
- Approximately 40 individuals printed parts for this project.
- The sculpture was subdivided into 260 parts using Luban.
- Participants were encouraged to include a coin in the parts they printed, in the style of the ancient Greek tradition of burying the dead with a coin in their mouth to pay the ferryman’s toll across the river Styx.
Full credit where due: the WeTheBuilders team ran logistics, conceptualized the project and sculpture, received and assembled the parts, and transported the finished project from Baltimore to Miami and back.
I look forward to participating in future WeTheBuilders projects and would encourage you to look into participating as well. At the very least, consider a bookmark and visit the site occasionally for updates.
Today Prusa made their latest alpha release of PrusaSlicer available on github: 2.6.0-alpha2. (Make sure you understand what alpha testing is before downloading/using this software. An alpha or release of a software package intends to do something particular, and mostly does so, yet isn’t guaranteed to do so fully. You are testing out an early version of this software, if you find a bug, report it.)
There are many game-changing features in this release, but in particular, this post provides step-by-step instructions on how to get the “auto downloading from printables.com directly into PrusaSlicer software”.
- Enable “Show PrusaSlicer button” in your profile while logged into printables.com.
Click the avatar icon (upper right corner), then chose the first line item (your user name), then scroll down next to the bold title “Info“, and click on “Edit your profile link”. When the modal window appears, scroll down to the checkboxes section and enable the checkbox for “Show PrusaSlicer button”, then click “Save” at the top of the window. - Enable download option in PrusaSlicer software.
In the menu, select Configuration -> Preferences (or Ctrl-P), then select the Other tab. Click the checkbox to “Allow downloads from Printables.com”, then choose “OK”.
These changes should make it so you see the the PrusaSlicer icon next to the download button while viewing a model’s “Files” list.
Select the PrusaSlicer icon next to the file you want to test, confirm (twice) that you want to allow the download integration, and everything should be working.
I’ve tested this on a Windows 10 PC using Chrome, Firefox, and Edge successfully with PrusaSlicer 2.6.0-alpha2.
Feel free to try out the integration on some of my models on printables.com.
Just some of the products we’ve made over the years:
- Scale architectural models (entire building structure, furniture/cabinet installation visualization)
- Large-scale art installations
- 3D models of topographical data (localized and regional)
- Woodworking and machining alignment fixtures and jigs
- Custom and hard-to-find automotive parts
- Templates for painting
- Guides for aligning and spacing assemblies
- Angle calibration gauges
- Custom enclosures for electronics projects
- Decorative figurines, vases, desk organizers
- Educational lessons for use in schools
Post a Model
Login to Printables with your username and password.
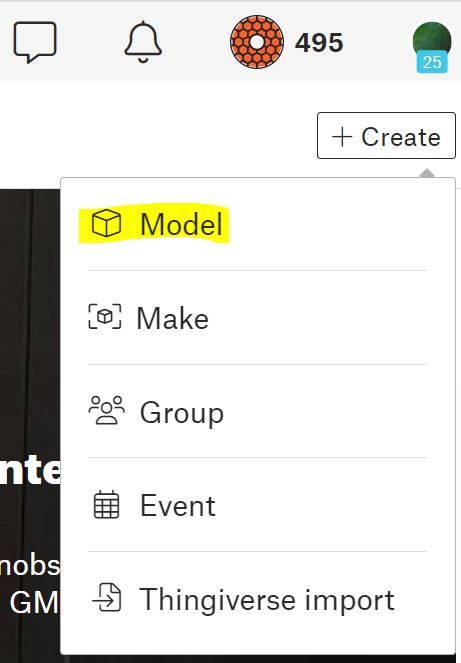
In the upper-right hand side of the screen, click the “+ Create” button (highlighted in yellow, below).

Select “Model” (in yellow, below) to upload a design that you have made or modified.
The minimum information that you will need to provide:
- A 3D model file of your design (.stl, .3mf, .step, sl1s, .stp, .amf, .obj)
- A picture of your model (.jpg, .gif, .png). This should preferably be a photo of the model printed out if possible, but a screenshot of a preview or render also seems to be acceptable.
- A name for your model
- A short summary of your model
- A category your model should be listed in (selected from a provided list
- Which license you wish to publish your model under
Enter and upload the required information and you are ready to publish your model for all to see.
If you aren’t ready to publish yet, leave the slider on ‘Draft’ and press the “SAVE DRAFT” button to save your draft for later use. When you are ready to publish your design publicly, click the Draft/Publish slider over to ‘Publish’ and then press the “PUBLISH NOW”.

Keep in mind that publishing is not a final, permanent decision. You can continue to edit your model and all fields about your model. If you decide there was a mistake or you want to retract your publish, simply slide the slider back to ‘Draft’ and press the “SAVE DRAFT” button to make it private again.
Additional fields
Above we addressed the minimal, required fields to publish your design to printables.com. There are a number of other optional fields you should consider completing to help the site and other users find your model more easily, categorize your model, or use your model more effectively. These include:
- Additional Tags
- linking Remix files (reference the original files)
- a detailed Description
- any other supporting files (.txt, .pdf (instructions))
- Print files (.gcode, .sl1)
You can also re-arrange your photographs that you uploaded and choose which one will be used as a cover photo (‘set as cover’) for your object in the 3D Models index on printables.com.
I have been doing 3D modeling and 3D printing since 2011.
I started out with a RepRapPro Mendel TriColour that I built from a parts kit and upgraded several times. This was a great printer, but was frankly borderline experimental. Everything had to be frequently adjusted by hand and successful prints were occasional (maybe 50% at its best.)
My second printer was a cousin to the first, a Prusa I3 MK3 (now an S) built from a kit that I got in November 2018. The improvements from the first to second printer include: auto bed levelling, filament run-out detection, magnetic spring steel flexible print plate, Bondtech dual gear extrusion system, custom E3D V6 all-metal hot end and resume on power failure. Basically, it has improved every area that could have been considered weak or unreliable through iterative engineering. The printer has been an absolute workhorse (currently at 29 kilometers of filament extruded) and my print success rate is more like 98%. Don’t call it fool-proof (they’ll invent a better fool) but it is a solid, consistent performer.
Over the last fifteen years I tried a variety of (mostly open source) slicers with varying degrees of success. SkeinForge, Slic3r, Repetier, Cura, KISSlicer, IceSL. Prusa forked Slic3r into PrusaSlicer which is currently the best, most integrated, and extensively developed slicer option available.
I’ve made extensive use of Blender, OpenSCAD, FreeCAD, and a variety of other open source, free, and for-pay, commercial (AutoCAD, SOLIDWORKS, OnShape) software over the years to design parts and make object repairs and modifications.
Categories
3D Printer Maintenance
Basic preventative maintenance will keep you printing problem-free. Periodically check and fix the following areas of your printer.
- Vacuum up all the little pieces and parts of filament that drop off as the printer heats up, failed print debris, etc.
- Dust your printer. Canned air will work fine. Blow out the fans, controller box.
- Check the extruder body internals for filament crumbs, buildup. Do a cold pull of filament.
- Clean your linear bearings and load them with grease. If possible, do this during initial printer build, or the next time you do a major overhaul.
- Check for wiring fraying or chafing.
- Check X, Y, Z round rods for any marring or flatspotting (indicating not enough lubrication) or other unusual wear. Do all the axes run smooth and straight?
- If your print quality is consistently low and no settings seem to improve it: it’s probably time to change your nozzle. They are relatively easy to change.
- Periodically check your printers bolt tightness, belt tension, any clearance/interference issues (pay particular attention to the zip-tie ends on the wiring management on the back of the extruder assembly).
Check your printer’s vendor’s documentation or website for specific maintenance suggestions.
Prusa i3 MK3 Regular Maintenance
6 tips for Original Prusa i3 3D printer maintenance
Just a little preventative maintenance will help your printer succeed in the tasks you give to it.
Categories
Help! My 3D printer is broken!
Blob of Death™, printer making weird clicking noises, parts dangling where they shouldn’t?
While using your 3D printer, you may find that you come across a print-stopping situation. You are missing a piece, something isn’t working right, a part broke, etc. I’d always recommend exploring your vendor’s support offerings. They will frequently walk you through the issue and/or send replacement parts. But there are times when you just need a part re-printed (now that your printer is broken…) and you’re stuck in a catch-22: You can’t fix your broken printer problem with a broken printer.
If you have the .STL files for the piece or pieces you need, we’re always willing to help a fellow 3D print enthusiast out of a jam. Just contact us with the details and we’ll see what we can do to help you get what you need.
Categories
So many filaments…
3D printing in plastic uses spools of plastic string (filament) as the raw material. The filament is melted and extruded layer by layer to build up the 3D shape that you want manufactured. Different filaments have different characteristics that make them suitable for particular purposes.
Common filaments we print with include PLA, PETG, ABS, HIPS, TPU, PC.
PLA – Polylactic Acid – easy-to-print, plastic made from corn starch, biodegradable. Comes in hundreds of colors and variations, PLA+, PLA-HT. Good for models and figures especially where mechanical or temperature resistance aren’t needed.
PETG – Polyethylene Terephthalate modified with Glycol – higher temperature resistance, used for printing technical and mechanical parts. Glossy surface, doesn’t shrink or warp.
ABS – Acrylonitrile Butadiene Styrene – Opaque, high temperature plastic, strong mechanical properties. Releases fumes, tends to curl.
HIPS – High Impact Polystyrene – lightweight, strong, structural plastic, relatively high temperature.
Flexibles (TPU, TPE) – Thermo Polyurethane/Thermoplastic Elastomer – Rubbery materials with a high elasticity. Used for bumpers, flexure joints, traction surfaces (tires).
PC – Polycarbonate – high-temperature, very strong, nearly transparent, very hygroscopic.
Each of these filaments requires different storage conditions, handling, nozzle temps and bed temperatures, bed surface/treatment (PEI, PVA, ABS slurry) to print successfully.
For those who are doing your own 3D printing, consider a Maker Box subscription (several options for amount and frequency) which will get you a wide variety of colors, mostly PLA, but a variety of other materials included as well.
Categories
How does 3D Printing work?
The first step of 3D printing something out of plastic is to define or get a 3D model of the object you would like to print. To define the object you would use 3D CAD (Computer-aided Design/Drafting) software like OpenSCAD, Autodesk Fusion 360, SketchUp, or OnShape that allow you to design your object and export the result as an .STL file. Alternately, you can search and find a part that has already been designed that also meets your needs. There a numerous 3D model repositories and index sites online where you can download (free and paid) models to print.
Once you have your desired object defined, it will be loaded into software called a slicer (we use PrusaSlicer) that will break the 3D object into a series of discrete layers and generate the step-by-step instructions for the 3D printer to follow to create the object. There are many variables (layer height, perimeters, infill type, infill density) and configurables (support, rafts, brims) that can be modified in the slicer to get the exact print result you want. The output of the slicer software is a .gcode file containing all the instructions.
This .gcode is then loaded onto the 3D printer along with the desired filament and the printer is given the instruction to start printing. The printer will heat up the bed and nozzle, the step through the instructions (gcode) created by the slicer. Depending on the size of the object, the layer height, density of infill the printing of your object can take anywhere from tens of minutes to tens of hours or even multiple days.
Once the print is finished the printer will cool down and the print will be removed from the print bed. Any necessary post processing (removing supports, sanding surfaces, finishing, painting) would then be performed. This process ends with a 3D plastic model of the object you designed or selected.
While the capabilities of 3D printers continue to increase and prices continue to decrease, we realize that not everyone wants to do every step of this process. We can help by performing any or every step of this process for you, or we can assist you in any area where you need help.